
🧭 Overview
Color: 🟡
Competitiveness: 🔥🔥🔥🔥
Difficulty: 🧠🧠🧠
Type: 🏹
Tempo: 🦅
🎯 Strategy
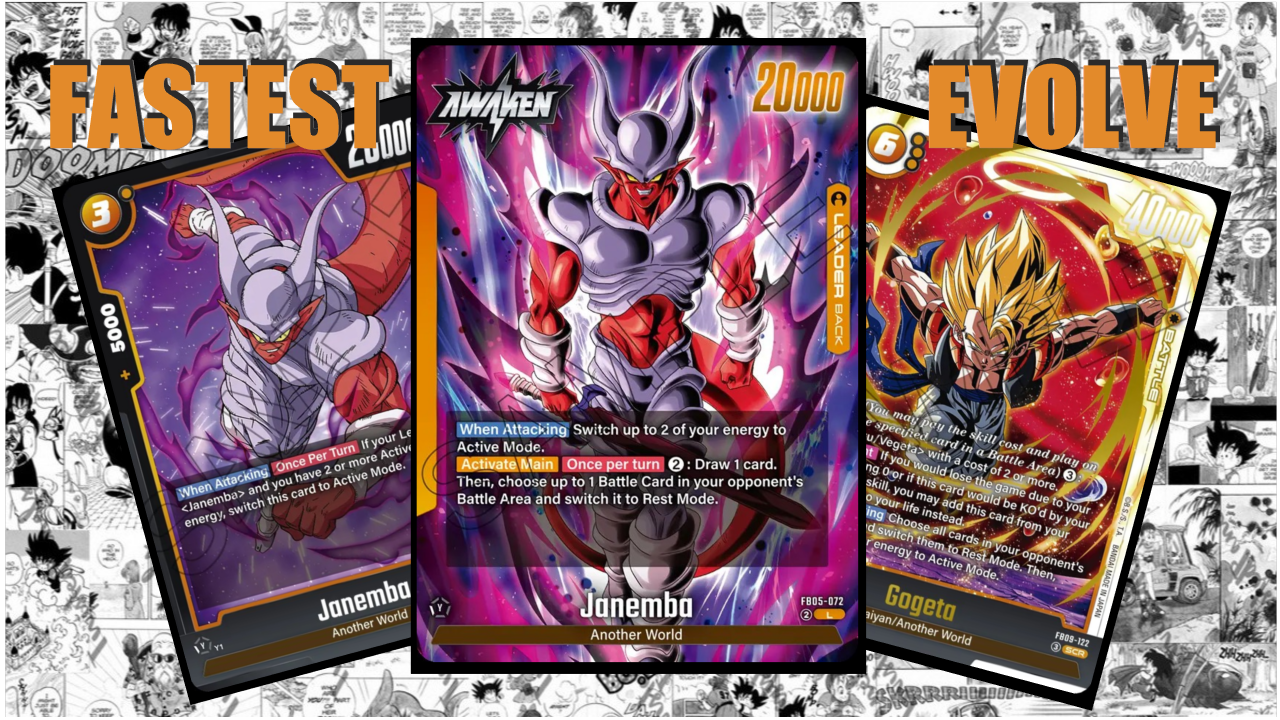
Janemba is fundamentally a flexible leader, this list exploits the new archetype support paired with a specifically fast Evolve package. Accordingly, we follow Janemba's development in the early game: starting with Saike Demon, which leads into fat Janemba, then we realize either Janemba's final evolutionary phase or Gogeta.
After awakening, our gameplay transforms completely thanks to the Leader ability. A path opens for us to put the 6c Gogeta on the board being only on 3 energy. To achieve this, we need two cards: the 2c Goku/Vegeta and Gogeta himself. Since the evolve cost requires a total of 5 energy, Janemba can manage this by refunding 2 energy after the 2c card is placed.
Once Gogeta is on the board, he is very difficult to remove. Taking advantage of this, we will have an extra 1 energy at our disposal every turn, as Gogeta refunds one when attacking. If your hand allows, you can perform additional evolve combos, playing the double-attacking Janemba or even Vegeta. The Gogeta Extra will help us keep the opponent in check while our board becomes increasingly unmanageable. Our victory goal is the continuous exhaustion of the opponent.
⚠️ Challenges
There are still not enough Janemba cards worth playing, and the deck suffers from a lack of combos. We can only search for Janemba cards, but even then not in sufficient quantities. A significant portion of the Another World evolve package is unreachable via search. We also cannot search for super combos, which is now a standard feature for every new deck. These introduce a level of inconsistency to the entire build.
🧱 Core Cards
FB09-082 Son Goku/Vegeta – The card onto which we evolve Gogeta.
FB09-122 Gogeta – Our entire strategy is built around bringing this out quickly.
💡 Tips
Combo the Saike Demon into a Leader swing so the 2-cost version can draw a card.
With Veku, you can pull life twice or reactivate a Goku/Vegeta pair that has been stripped of its abilities.
Calculate your energy at the start of the turn, as several of our cards refund energy, which can significantly change the flow of your turn.
📈 Meta
FS11-14 Vegeta: Perfect for removing certain 5-cost cards, such as the 5c yellow evolved Goku or blue Vegeta.
FB02-136 Blue Power Awakening: The only solution against the current 6-cost craze.
⚙️ Fine-Tuning
Additional Cards
Energy Utilization
Zangya: Perfectly fine for turn 2, and can draw cards later using freed-up energy.
Results of Training: +15k and a draw.
Dazzling Onslaught: Effectively +25k for just 1 energy.
Ratio Adjustments
By discarding the Janemba package, space is freed up, allowing us to run only what we truly need.
🎥 Gameplay
Client
FB09 Free
67457698-7426-49e8-944b-2faa63519f02 - turles; silver
80a7afc2-6207-4ccc-a29a-a473d19a279f - kinameku; silver
4ddb8f1b-ec50-42dd-b963-68c1d5788ff4 - ss3ku; gold
7233b5bd-190d-4e1e-abb7-de22fe38a8b5 - switchgota, master (youtube)
9fc22bc8-b763-4016-92a5-5f4636969e8f - kinameku; gold (youtube)
5bca4adf-8834-49e1-be36-dfda1ed03d35 - shallot; gold (youtube)
86c440fa-84ec-4155-988d-2e81e6a6b044 - caulifla; master (youtube)
Ranked
c8e40d48-7a29-43a7-9e08-710c735675a3 - kiogeta; platinum
dcf95c40-765a-4247-8cf3-11f263a2e722 - kiogeta; platinum (youtube)
b6e6a972-364a-4ae4-aa0f-20cc55c5cff4 - beasthan; platinum (youtube)
YouTube
📃 List
💬 Personal Notes
Janemba is one of my more liked leaders. The Leader himself provides a type of flexibility that several decks have since copied, but he was the first in this sense (not counting Yellow Vegeta, who could only use it for defense). The perfect example of this was the period when he could perform as a competitive deck using the Ginyu cards. That was my personal favorite era for Janemba.
The original vision was never fully detailed, it was always a deck that mashed good stuff together, which has now changed somewhat with a few support cards. This gave us the opportunity to actually play with Janembas. At the same time, he has the ability to adopt parts of new mechanics and thus compete with most decks. I misunderstood Janemba at the start of this set. I couldn't see the forest for the trees and misjudged him. Being able to discover a new list and strategy proved once again that Janemba is in the game for a reason and is worth playing. The only unfortunate factor, besides the inconsistency, is that it is a very expensive deck due to running 4 SCRs, which I believe is mandatory since they cannot be searched.
🔑 Legend
Icons
Type: 🗡️ Aggro | 🏹 Midrange | 🛡️ Control | 🔗 Combo
Tempo: 🐌 Slow | 🐇 Medium | 🦅 Fast
Difficulty
🧠: Beginner-friendly, perfect even for your first game.
🧠🧠: Easy; requires attention to a few small details, but follows a simple and clean strategy.
🧠🧠🧠: Requires learning, but becomes routine after sufficient practice.
🧠🧠🧠🧠: Requires a deep knowledge of both your own deck and the opponent's; demands situation-dependent decision-making.
🧠🧠🧠🧠🧠: Demands perfect play in both decision-making and execution through complex sequences.
Competitiveness
🔥: Unplayable; does not perform under any circumstances.
🔥🔥: Underperforms; highly dependent on favorable circumstances.
🔥🔥🔥: Performs well; perfect for casual play, but at a clear disadvantage against dominant decks.
🔥🔥🔥🔥: Suitable for competitive play; in theory, a skilled player can hold their own against anything.
🔥🔥🔥🔥🔥: Dominant; a typical "boogeyman" deck that everyone hates to face.
Glossary
Aggro: A strategy that ignores the opponent's game plan with the goal of ending the match as quickly as possible, in this case through relentless attacks.
Midrange: A strategy that seeks a middle ground, attempting to balance the tempo. It tries to slow down fast decks and outpace slow decks. Board control is a vital tool here.
Control: A strategy entirely focused on neutralizing the opponent's plays. It settles in for a long, slow game where the goal is to bleed the opponent out of resources.
Combo: A strategy that aims to win (or at least cause a radical shift in the game state) through the synergy of specific cards, often appearing to come out of nowhere. The goal is to gather the necessary components and fulfill the prerequisites as quickly as possible.